

Mopidy Pummeluff – A music box for kids – confirm blog
Mopidy is an extensible music server written in Python. It supplies loads of totally different music sources, comparable to Spotify, SoundCloud, Google Play Music, and extra. It’s an ideal open-source answer and different for SONOS, operating on a Raspberry Pi.
It’s practically excellent for youths, and the one factor lacking is a kids-compatible interface. That’s the place my new plugin Pummeluff is available in place.
The interface
In the event you bear in mind your childhood, you may bear in mind this gem:
Then you may also bear in mind the nice previous instances, if you had been searching for a freakin’ pen, to rewind and screw the tape again into your cassette tapes. Other than that, the walkman was fairly superior! One motive why it was so superior was its simplicity. The interface was nicely designed, straight-forward and simply easy. There was no swipe-to-unlock, passcode immediate, bluetooth connectivity points or alike. It was lifeless easy: Put a cassette tape into the magic field, press play and also you’re good to go.
I’m positive, this was one of many keys for the success of the Walkman. And that is precisely what I’m making an attempt to realize with the on-going mission. I’m making an attempt to use cutting-edge know-how, comparable to a Raspberry Pi, Debian Linux and the Mopidy server and connecting it with simplicity.
As a substitute of controlling Mopidy through net interface and all that fuzz, I used to be searching for a less complicated answer. One thing that even the little ones can management with out being a grasp thoughts in know-how (but). That’s the place I got here up with RFID. An RFID interface may be one thing so easy, straight-forward and exquisite. It even helps the human nature of grabbing one thing and placing it on a selected spot.
Idea
Having thought in regards to the so vital interface, I already had a giant a part of my idea. And right here’s the remainder of it, or not less than what I used to be making an attempt to realize:
- A small-ish all-in-one music field
- It have to be moveable and power-efficient
- It should play native songs from the SD card
- It should additionally assist NAS techniques and combine Spotify
- It should assist RFID tags and buttons as interface
- It ought to be developed in Python
- Final however not least, it have to be KISS
As a result of my sister and a few buddies of mine lately obtained offspring, I believed this entire music-box-thingy can be an awesome present. So the price ticket of the entire package deal was essential, thus I used to be searching for an inexpensive answer.
{Hardware}
It was time to get some {hardware}. Right here’s what I’ve obtained:
- A Raspberry Pi 3 Mannequin B (~ CHF/USD 40)
- A USB energy financial institution with passthrough charging (~ CHF/USD 15)
- A pair of USB powered audio system (on AliExpress for ~ CHF/USD 3)
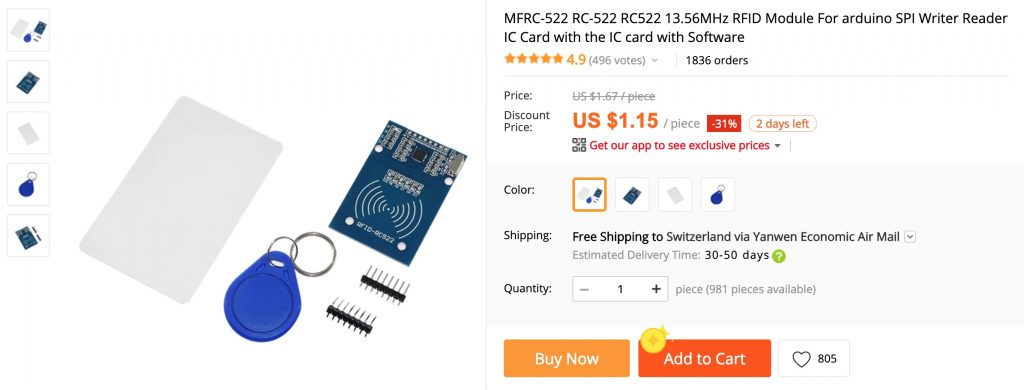
- An RC522 RFID module (on AliExpress for ~ CHF/USD 1)
- ISO 14443A tags (on AliExpress for ~ CHF/USD 0.4 per tag)
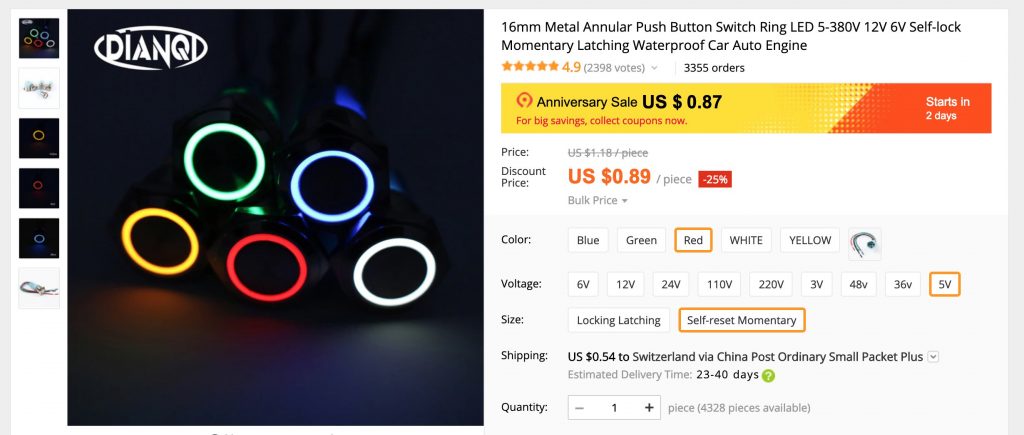
- Two push buttons (on AliExpress for ~ CHF/USD 1)
- Feminine jumper wires (on AliExpress for ~ CHF/USD 1)
As you may see, the costliest elements are the Raspberry Pi and the ability financial institution. So you find yourself with a package deal value of roughly CHF/USD 60, with out the RFID tags. I’d name that inexpensive, and you may even get it cheaper should you’re searching for a used RPi and energy financial institution.
The RC522 RFID reader is kind of small and may work with Mifare & 14443A tags. There are additionally starter packages with included tags obtainable:
Mopidy / Pummeluff helps a standing LED, which lights up when its prepared. That turns into useful, particularly after we shutdown or restart the RPi. I didn’t wish to have a separate standing LED, thus I made a decision to make use of buttons with built-in LED’s. There are many them obtainable and I used these 5V momentary push buttons:
I used to be going with the RPi 3B as a result of there was one mendacity round on the workplace. Nonetheless, a 3B+ must also work high quality, because the GPIO pins are the identical. Sadly, I don’t know in regards to the RPi 1, 2 and Zero fashions, however you can provide it a strive.
Connecting the {hardware}
Now it’s time to attach the {hardware}. I’m a bit lazy, so I gained’t describe right here the way you’ve to conenct the items. Simply head over to the GitHub repo or PyPi repo and join the elements like described within the Connecting… chapters.
When all the pieces is linked, proceed to the following chapter.
Raspbian
To begin with, we have to setup Raspbian on the microSD card of the RPi. I’m not going to elucidate how one can set up Raspbian in your RPi, as there are already loads of wonderful tutorials on the market. There’s additionally an official Raspberry Pi Set up Information.
Boot your Raspbian and configure it by operating the configuration utility:
sudo raspi-configConfigure the next choices:
- 2 Networking Choices
- N1 Hostname: Enter your required hostname
- N2 Wi-fi: Enter your WLAN settings
- 4 Localisation Choices
- Change the specified settings
- 5 Interfacing Choices
- P4 SPI: Allow the SPI interface (vital for the RFID module)
- 7 Superior Choices
- A3 Reminiscence Break up: Set the CPU reminiscence to eight MB
Now, your RPi ought to be linked to the WLAN. Get the IP tackle by operating:
ip a s wlan0Let’s change the password of the pi consumer, allow SSH, improve the system after which reboot it:
# Change the password.
passwd

# Allow SSH after boot and begin it.
sudo systemctl allow ssh
sudo systemctl begin ssh

# Replace system.
sudo apt replace
sudo apt dist-upgrade

# Lastly, reboot it.
reboot
Your RPi is now up to date and may come again up. This implies, we’re able to go to put in Mopidy.
Mopidy
The set up of Mopidy is kind of easy. Simply execute the next instructions:
# Set up Mopidy apt GPG key & repository.
wget -qO -  | apt-key add -
wget -qO /and many others/apt/sources.listing.d/mopidy.listing

# Replace sources.
apt replace

# Set up mopidy and pip.
apt set up mopidy python-pip
This ought to be sufficient to put in Mopidy. Nonetheless, there are additionally some extensions you could be excited by.
HTTP server
Mopidy comes with an built-in net server referred to as Mopidy-HTTP. By default, the online server is barely listening on the native interfaces, so that you wish to add the next config to the Mopidy configuration:
# /and many others/mopidy/mopidy.conf

[http]
hostname = 0.0.0.0
It is best to now have the ability to connect with Mopidy through IP}:6680/.
MPD server
Now, the online server itself has no net interfaces to regulate Mopidy. It’s only a easy net server. Nonetheless, there are a number of net UI’s which might do precisely that. Probably the most of them are primarily based on MPD (Music Participant Daemon). Luckily, Mopidy additionally comes with an MPD server referred to as, guess what, Mopidy-MPD. Sadly, it’s additionally listening solely on localhost, so add the next bits to the Mopidy configuration as nicely:
# /and many others/mopidy/mopidy.conf

[mpd]
hostname = 0.0.0.0
So, as we now have a HTTP & MPD server listening on all RPi interfaces, we will add an MPD net shopper to regulate Mopidy.
Iris
Iris (previously generally known as Spotmop) is a very nice MPD net shopper, which is operating immediately on the built-in Mopidy HTTP server. You possibly can set up Iris through pip:
pip set up mopidy-irisThat’s it! Iris, the superior MPD net shopper is put in and is offered through the Mopidy HTTP server.
Spotify
If you wish to take heed to Spotify songs, you additionally want to put in the Spotify extension. To put in it, we will use pip once more, however we have to set up some apt dependencies first:
apt set up libspotify12 libspotify-dev libffi-dev
pip set up mopidy-spotify
In the event you can’t discover / set up libspotify, be sure to’ve configured Mopidy’s personal apt repo.
After you’ve put in the Spotify extension, you’ll want to configure it based on the official github repo and/or the Mopidy web site. The ultimate configuration appears like this:
[spotify]
username = … your username …
password = … your secret …
client_id = … client_id worth you bought from mopidy.com …
client_secret = … client_secret worth you bought from mopidy.com …
Pummeluff
Creating Pummeluff
I used to be fairly amazed by Mopidy and the prevailing extensions. A lot of the options I used to be searching for had been already obtainable in superbly crafted PyPi packages.
So the final lacking bit was the communication with my {hardware} interface, generally known as RFID reader & push buttons. That is the place I began creating Mopidy Pummeluff, as I couldn’t discover something usable on the web.
Right here’s what Pummeluff does:
- Including a net UI which lets you assign actions to RFID tags
- Studying RFID tags and executing the assigned actions
- Reacting to button pushes and executing the assigned actions
The next actions may be assigned to RFID tags:
- Changing the tracklist with a brand new URI (e.g. Spotify monitor or playlist)
- Setting the quantity to a brand new degree
- Pause, resuming or stopping the playback
- Shutting down the system
As a result of I needed the ability financial institution to final for a really very long time, I did two issues:
- I’m utilizing interrupts, which suggests we gained’t have limitless CPU cycles wasted simply to learn RFID tags or ready for button pushes. Much less CPU cycles equals much less energy equals extra battery life.
- I’ve added a energy button to shutdown the RPi into halt state and wake it up once more.
Putting in Pummeluff
To begin with, we have to give our Mopidy consumer a little bit bit extra permissions, so it will probably entry the SPi interface and GPIO pins:
sudo usermod -a -G spi,gpio mopidyAs a result of I additionally wish to shutdown the entire RPi with a push on a button, I needed to create a sudo rule for that:
sudo echo "mopidy ALL = NOPASSWD: /sbin/shutdown" > /and many others/sudoers.d/mopidyNow it’s time to put in the Pummeluff extension:
sudo pip set up spidev
sudo pip set up mopidy-pummeluff
Final however not least, restart Mopidy:
sudo systemctl restart mopidyAnd we’re able to go. Level a browser to the Mopidy Internet UI, which by default is reachable like so:
_IP}:6680/
Within the browser you must now have the ability to management Mopidy through the execellt Iris Internet UI, and register new card through Pummeluff’s easy (and never very shiny) frontend.
Proof of Idea
To check when all the pieces is linked collectively, I used an previous wine field. And right here’s how my PoC field appears like:
It doesn’t win a design award, and I may’ve given it a pleasant end. However hey, it’s solely a proof of idea and I’m minimalistic, so no bending over backwards right here.
Within the meantime, I’m already testing (used) toys, that are massive sufficient to suit all the pieces into it. The RPi and energy banks are in all probability the biggest elements, however the RFID reader and buttons are fairly small (and there are smaller counterparts obtainable). The audio system aren’t very high-quality, however they ship an honest sound for that value (it was approx. 3 USD). Due to their low cost casing, I may take them aside and save loads of house there as nicely.
In fact I’ll add new images as quickly as I discovered a correct dwelling for these electronics.
Verdict
I didn’t thought the mission goes to be so straight-forward once I began it. Nonetheless, through the use of a Raspberry Pi and the superior Mopidy music server, I already had a stable base. With some extra {hardware} and a little bit of programming, I achieved a very nice outcome. The Spotify integration can also be a giant plus, as Spotify has not solely music, but in addition loads of fairytales for the little ones. In fact it’s also possible to add music on to the SD card of the RPi or join your NAS share to it.
As I like open supply and the group behind it, I believed I’ll cowl the entire thought on this weblog put up and publish my supply on GitHub.
I hope any individual else can use this mission for his or her children, and I’m all the time joyful to assist. Be at liberty to contact me any time.
Source link

